

When a couple of my Ryobi battery packs started to die I decided I wanted to replace the batteries inside of them instead of buying more Ryobi packs. To do this properly you really need a battery terminal spot welder so I went out looking for one. What you come to find out is that unless you spend ~$400 you’re not going to get a great one. I decided to go for a cheap one and see where it took me. The unit I selected was a 110v Sunkko 737G unit.
What I didn’t realize is that the power requirements for the 737G at 110v(120 in application in the US) was for a Class C breaker rated at 40 Amps. A normal 15-20 amp circuit breaker tripped quite quickly, and the welds I did get were pretty bad. The only solution I had seen for this was to convert it to 220v/240v operation. I’m using xxx/xxx voltages since in the use our power is 120v/240v in most places, and that’s where this is marketed, though it’s specs are all 110/220 listed but from here on I’ll just use 110 and 220.
The Sunkko 737G contains a transformer which is reconfigurable for the main windings to be in parallel for 110v operation, or in series for 220v operation. In order to reconfigure it you’ll need to be able to know how to solder/desolder, if you can do that, the rest is easy.

To start you’ll have to unplug it, break the warranty seal (warranty void) and then remove all of the black screws on the perimeter of the cover. This will expose the insides and you’ll see the transformer with white silicone over the power configuration board.

Use appropriate tools to remove the white silicone over the wires and against the transformer, plastic scrapers and some patience will help. Try not to damage the circuit board, wires or other parts of the transformer. This stuff is pretty rubbery so it may take a few minutes.
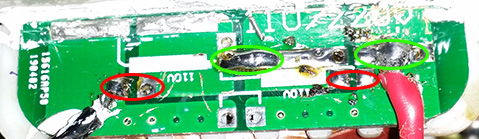
Once you expose the circuit board, de-solder the red and black wires, and then remove the solder bridges at the red circled areas shown in the picture below. Reattach the wires where shown in the photo, and make sure to solder the bridge in the middle marked in green. This photo shows AFTER the mod, yours should look like this (or better lol).
Once you mod the wiring, put the cover back on and then cut the 110v plug off the end of the power cord. Wire up an appropriate power plug for your power source. I had a NEMA 6-20 used for a space heater, so I replaced my plug with a nema 6-20P. Where you have blue, brown and green/yellow wires, the blue and brown go to the 220 mains terminals and the green/yellow wire goes to the ground terminal. Research for your own requirements before doing this mod.

The spot welding has much improved over what I was getting and I was able to finish my battery pack rebuild. This is not a review of the unit, just information about modding it. I will make a post about rebuilding a Ryobi pack which will also serve as a review a bit later.
7 responses to Modify SUNKKO 737G From 120V to 240v Operation
I like your idea and the way you presented it.
I have questions about the wall outlet plug.
I assume you connect the two line wires ( red and black) to the transformer inputs.
What did you do with the neutral wire (white)?
what did you do with the ground wire (bare copper)?
Was no modificationrequired on the motherboard?
Spec. Resistance coil in transformer 220V. ?? (Ohm)
I checking point 3,6 =1.2 ohm OK or NG
Thank you.
Charan.T
Thank you
Isnt the control panel powered by the main voltage? I see most of the sunkko welders have the input wires from either the 110V or 220V wall power outlet going to the control panel first and then come back to the transformer primary coil. If your model’s control panel is designed for input voltage of 110V, supplying it with 220V may burn out some of the components, no?
Thanks for posting this! I have exactly the same need but due to bad planning, ordered the wrong version. Will inspect your method.
Thanks for posting these instructions. I figured this conversion must be possible, and it was nice to have confirmation that it could be done without turning the welder into a burning fireball of death. =) Mine’s working perfectly on 220v now.
Nice job there! Thanks for sharing that.
Leave a reply to Modify SUNKKO 737G From 120V to 240v Operation